How do you read METARs when there is so much extraneous information? Aviation Routine Weather Reports (METARs) are a must for every flight, but for something so vital they are difficult to read.
Even programs like Foreflight don’t decode all of the METAR. They typically leave off the remarks (RMK) section leaving pilots to wonder what the rest of the METAR means.
This article will take a deep dive into how to read every aspect of the METAR. By the end, even the most experienced pilots will learn something new.
Let’s get started.
Where to get METARs and TAFs
There are two primary places to get METARs and TAFs: NOAA’s aviation weather site or an aviation app on your smart device.
I personally use Foreflight. It is hands down the most advanced aviation and weather flight planning tool out there. But if you don’t use iOS devices, check out this article on the Top 8 Weather Apps for Pilots.
For those of you who want free, here is a screenshot from the Aviation Digital Data Service-Aviation Weather Center (ADDS-AWC) website.

You can click on either METARs or TAFs. It doesn’t matter which since both tabs will let you select both METARs and TAFs. Enter the airport identifier of the airport(s) you need. You can enter multiple airports at once.
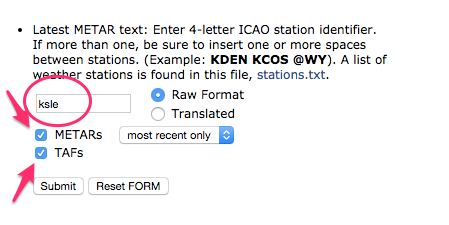
I suggest you always choose both METARs and TAFs. The METAR only gives you a small snapshot in time. They are only good for an hour. They are usually refreshed around 55 past the hour.
TAFs, on the other hand, cover a 24 to 30 hour period and they are published 6 times a day (0000, 0600, 1200, 1800).
ADDS lets you print out the METARs and TAFs. I suggest you print them and take them with you in the aircraft. I also suggest you print the airport diagram even if you have Foreflight.
While the AWC website is a great resource for checking the weather, oftentimes, flight planning software like Fltplan.com is a better way to get weather.
Pilots can plan their flight, create and file a flight plan and get weather all in one location on Fltplan.com. I used Fltplan.com every day when I flew for a Part 135 operation, and highly recommend it. You can print your flight as well as the weather in one packet you can take with you.
They also have a really neat feature that helps you decode METARs.
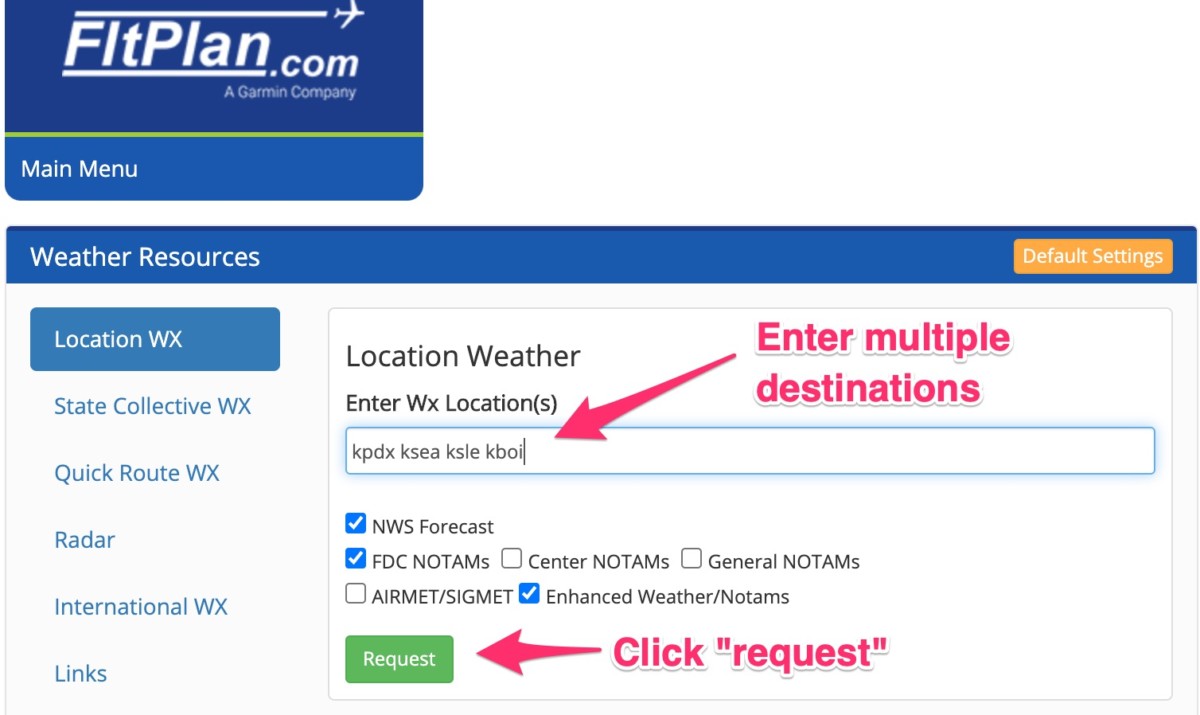
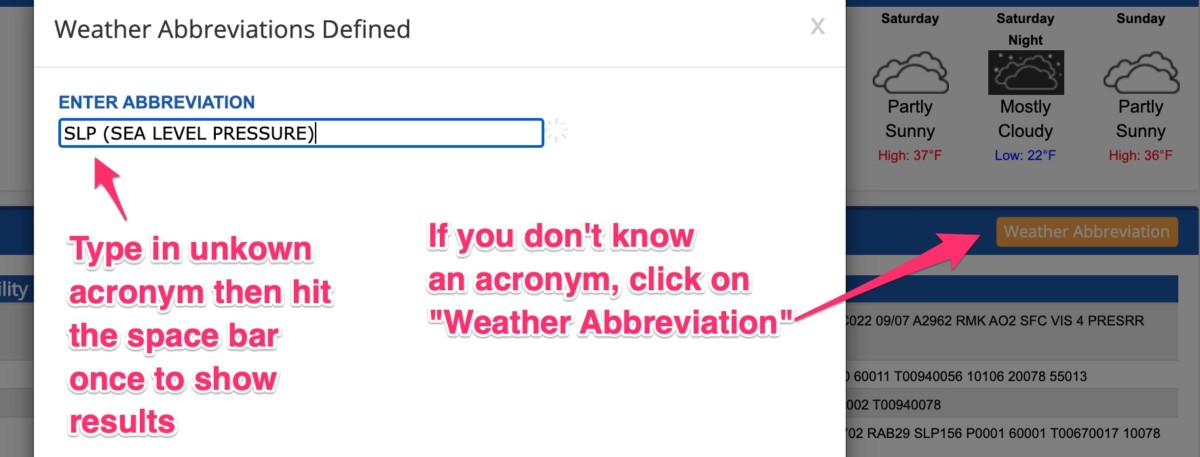
Getting METARs is actually the easy part. The rest of this article will cover the nitty-gritty details to include what’s important and what you can ignore.
How do you read/decode METARs?
Let’s break down METARs into their individual components.
Here is an example METAR and TAF from Salem, OR (KSLE). The top line is the METAR and the bottom six lines are the TAFs. As you can see it’s not such a great day today!

I like to break down METARs into two parts.

How to Read METARs: the easy part
Airport Identifier
The easy part is straight forward. It always starts with the airport identifier.
![]()
Time Group
Next comes the date/time group. It is always in UTC time. If you need to translate UTC time to your current local time bookmark this website: UTC time
![]()
The first two numbers are the day. In this example, it is the 17th. NOAA assumes pilots know what month they are in, so, you will never see the month. The next four numbers indicate the time. It is 2056Z.
The “Z” is for “ZULU” time. Zulu time is another way of saying Universal Coordinated Time (UTC) or Greenwich Mean Time (GMT). They are all the same thing.
Winds
Next are the winds:

The first three numbers “180” are the direction the winds are coming from. In this example, they are coming from the south or from “180 degrees.” If you don’t see any numbers it means the winds are calm. Portland’s current METAR says “00000KT.”
The next two numbers indicate the strength of the winds. They are 14 knots in the example above.
The “G” stands for gusts. The winds are gusting up to 21 knots in this example.
Often times you will hear aviators talk about the “gust spread.” To get the gust spread subtract the sustained winds (14kts) from the max reported gust number (21kts).
21-14=7 knots
The gust spread is an important number to know because it can be an indication of wind shear. In this case, the gust spread is only 7 knots. Not too bad, but still something you need to pay attention to.
If you don’t see a “G” then there aren’t gusty winds. That’s a good thing. If you fly small airplanes, gusty winds should make you stop and think a little bit.
At a regional airline I flew for, anytime the gust spread was more than 10 knots, we took precautions for wind shear. We adjusted our procedures and keep the Bleed Air off on landing and takeoff to give us more power should we need to execute a missed approach.
The “KT” stands for “knots.” It’s just a friendly reminder that winds are always reported in knots. You will never see the winds reported in miles per hour. Get used to thinking in knots.
TEACHING TANGENT: Sometimes wind direction can be confusing for new aviators. Just think of it like this: when the winds are “180,” if you stood looking south you would get a face full of wind.
Winds aloft and surface wind depictions are also a bit confusing. Here is a pic of winds aloft. It may seem like the winds are coming from the East. For some reason, I think of the barbs as windsocks, but they aren’t. They show where the winds are coming from just like the METAR. You would have a hell of a headwind flying west in this example.
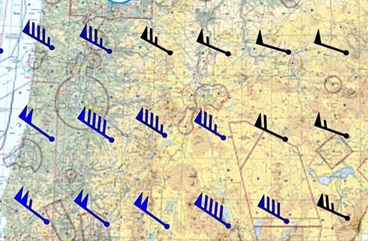
To prove it here is a screenshot of Foreflight’s winds aloft in text (yet another reason I love Foreflight). The picture above shows winds aloft at 21,000 feet. The barbs show winds are out of the northwest which is confirmed when you look below and see the winds are 292 degrees at 21,000 feet.
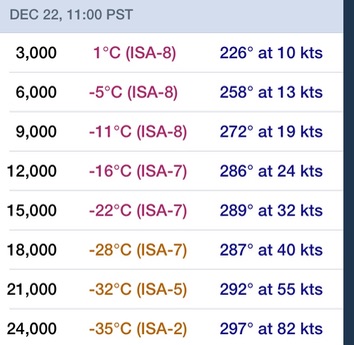
Visibility
After the winds, you’ll find the visibility.
![]()
They are 10 statute miles in this example. You will never see this number reported in nautical miles. You will also never see the visibility reported more than ten statute miles. You may see “9999” which indicates visibility is so awesome it deserves a bunch of 9s.
Also, anytime this number drops below three statute miles, the airport is operating under IFR conditions. The rotating beacon will come on during the day.
Here is an example of the visibility falling below three statue miles:
![]()
At some automated stations you may see an “M” before the visibility. This indicates the visibility is “less than” whatever number is given. So, if you see a “M1/4SM” it means the visibility is less than 1/4 statute miles.
M=minus or less than
You may also see a “P” before the number. Today in Portland, the TAF says “P6SM.” This means the visibility is forecast to be more than 6 statute miles.
P=more than
At larger airports, you will also see RVR values in the METAR. Here are some ways you will see RVR values reported:

Weather Condition
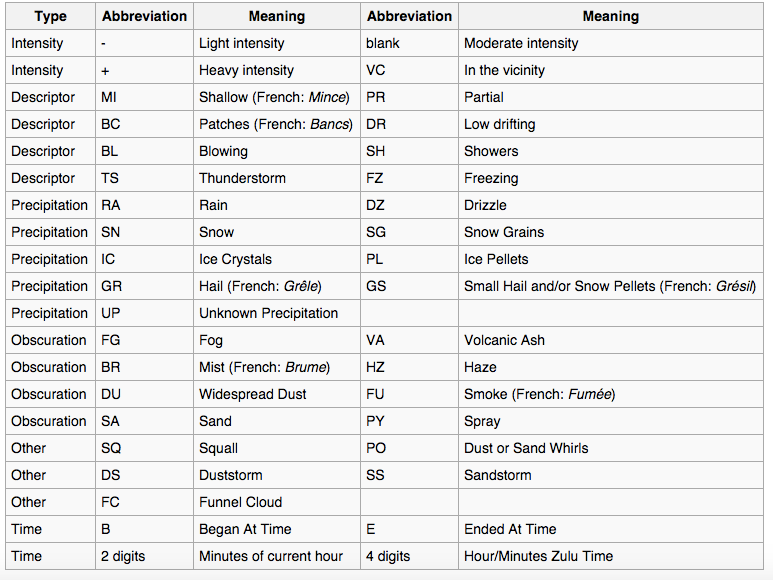
Next you will see the description of the weather. I pulled this chart from Wikipedia. You should know most of these by heart especially “RA” for rain and “BR” for Mist, “FG” for fog, and “SN” for snow.
“VC” or “in the vicinity” means within 5 to 10 statute miles from the point of observation. The “VC” is always combined with another abbreviation like showers (SH), or thunderstorms (TS). So you will see it written like this: “VCTS,” or “VCFG.”
I have found the “-” number, which indicates “light,” is oftentimes misleading. Portland’s METAR will say “-RA” even when it’s pouring. So, be careful when you see the “-” and treat it with healthy skepticism.
The absence of a “-” or “+” means moderate intensity.
The “+” should certainly give you serious pause. It takes a lot to get a “+” on the METAR.
If you see “SQ,” “FC,” “IC,” or “PL,” you should almost certainly go home. Fly some other time.
Here are some other combinations you may see:
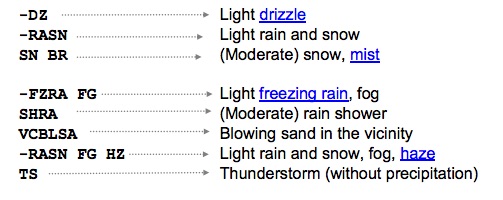
TEACHING TANGENT: You need to be worried when you see the “TS.” You should immediately look for any active convective SIGMETs. For a more in-depth article on AIRMETs and SIGMETs, click here.
Cloud Coverage
After the weather description, you’ll see the cloud coverage.
![]()
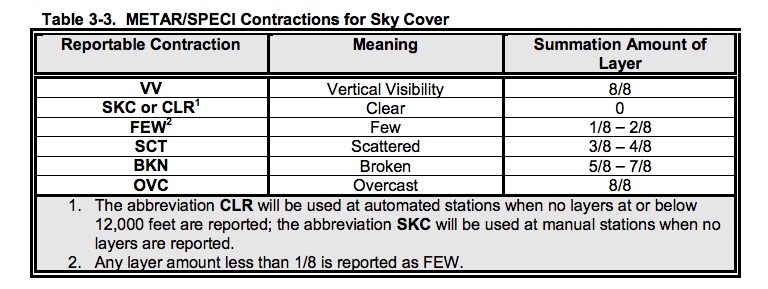
Remember “Scattered” and “Few” don’t count as a ceiling. Only the “Broken” and “Overcast” layers are ceilings.
The numbers can be confusing so here is a trick: always add TWO zeros to the number. When you add two zeros to “OVC010” and you get overcast at 1,000 feet.
I really get concerned when I see “OVC001,” or “BKN002.” When you see those numbers it means the ceilings are 100 feet and 200 feet. If you see these numbers in the METAR, make sure you brief the missed approach procedure because you probably won’t break out.
Here is a chart from the Aviation Weather Services AC 00-45g (page 51) which explains sky cover contractions.
If you do see a “VV” on your METAR report it’s probably because you have fog or dust in the area. There aren’t any clouds per se, but you won’t be able to see much. When you see “VV” seriously consider staying home.
Here are some more examples you will see:
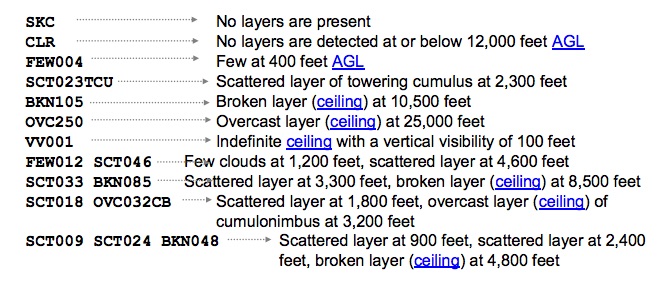
Sometimes you will see a cumulonimbus “CB,” and towering cumulus “TCU,” in the report. The number reported with it is the base of the cloud and not its height.
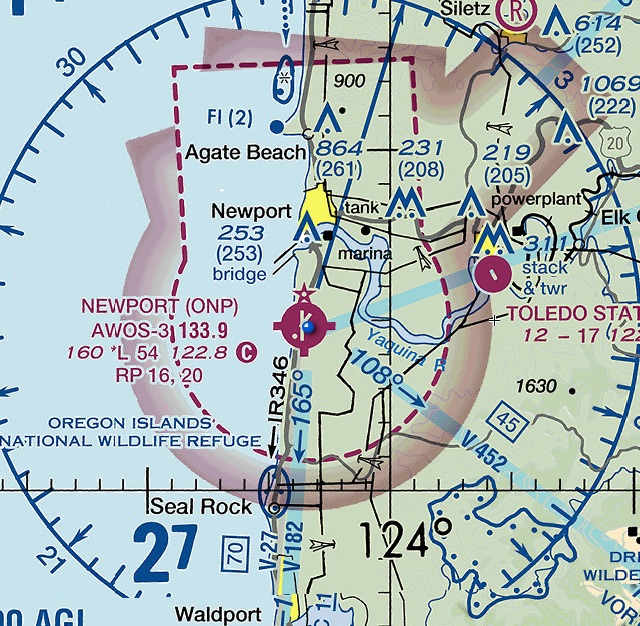
TEACHING TANGENT: For VFR pilots, anything less than 1,000 feet means you will need to get a Special VFR clearance from the tower (at controlled airports).
You also need to be careful at airports with surface Class E like this one in Oregon with no tower. Surface Class E airspace is considered controlled airspace so keeping “clear of clouds” won’t work. With ceilings less than 1000 feet, you have to talk to Center and get Special VFR permission to land at this airport.
Also, you can’t do special VFR between sunset and sunrise (at night) unless you hold an instrument ticket.
Temperature and dew point
The next part contains the temp and dew point.
![]()
These numbers are always reported in degrees Celsius. The first number is the current temp and the second number is the dew point.
An “M” before the number means it is a negative number or “minus.” So, “M12” is minus 12 degrees Celsius. Cold!!
TEACHING TANGENT: Pay attention to these numbers when they are within two degrees of each other. With light winds and a low temperature spread you may see fog.
I have been fooled before by these numbers before. In the early morning they may be four degrees different which isn’t a problem….yet. As the sun rises the temperature changes, a clear day can turn into a nightmare. The TAF should anticipate fog, but not always.
Remember, METARs are a static picture in time. They are usually published at 55 past the hour. You need to do some advanced decision making and think about what the temperature will do from the time you get the weather to when you take off.
Altimeter setting
The final section of the easy part is the altimeter setting. The “A” stands for altimeter and the number following is the altimeter setting around 55 past the hour. ![]()
TEACHING TANGENT: When you do your run up, dial in the current altimeter and compare what’s in the window to the airport elevation. If your altimeter is more than 75 feet different than the official airport elevation, get it serviced.
Also, if you happen to have two altimeters in your aircraft make sure they read within 100 feet of each other.
That wraps up the easy part of the METAR.
How to Read “Remarks” in METARs
This is the part of the METAR that no one, including myself, pays attention to, and for good reason. Half of the remarks section was never intended for pilots.
Don’t ignore the remarks section completely, though. The beginning section of the Remarks section has some pretty awesome information if you know how to read it.
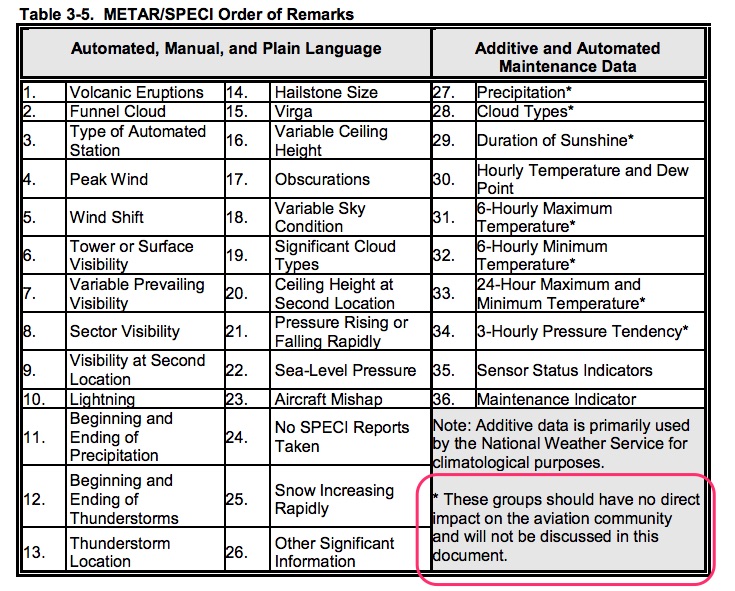
There are 36 different types of reports you will see in the remarks section and they are listed in the table below.
Notice the “Additive and Automated Maintenance Data” with the asterisks is not for pilots which explains why you don’t need to pay attention to the last part of the remarks section.
Automated Manual Plain Language: the useful part of the Remarks section
1. Volcanic Eruptions: This remark is self-explanatory. It will have the name of the volcano and the location of the ash cloud.
2. Funnel Clouds: You will see TORNADO, FUNNEL CLOUD or WATERSPOUT with the time it began and ended.
3. Type of Automated Station: This is a common Remark.
You will see either an AO2 or AO1.
![]() The A01 indicates the station has no way to differentiate between types of precipitation. It may be raining or snowing, but you won’t know it if you see an AO1.
The A01 indicates the station has no way to differentiate between types of precipitation. It may be raining or snowing, but you won’t know it if you see an AO1.
The AO2, on the other hand, can tell the difference between snow and rain.
The higher the number, the more advanced the equipment. Think of AO2 as Version 2.0.
4. Peak Wind: This is a useful remark. Don’t ignore this one.
Here is an example: PKWND 35045/20
The first three numbers, “350” indicate the wind direction it’s coming from. The next two numbers, “45” indicate the wind speed in knots. The number after the slash is the time after the hour. The “20” in this case means the peak wind happened at 20 past the hour.
5. Wind Shift:
It looks like this: WSHFT 30
The number after the WSHFT is the time the wind shift happened. So in this example, the wind shift occurred at 30 past the hour. If the wind shift happened due to a frontal passage you will see a FROPA after the “30.”
6. Tower or Surface Visibility:
It looks like this: TWR VIS 1/2 or SFC VIS 3/4. This remark is useful because this will tell you if Tower can see you.
7. Variable Visibility: This is important to let you know conditions are changing. You don’t see these often.
It looks like this: VIS 1/2V1. The “V” in any METAR indicates “variable.”
8. Sector Visibility: This can be useful if only a certain part of the airport has bad visibility.
It looks like this: VIS N 2 1/2. The Sector can vary between S, SE, SW, W, NW, NE…..you get the point.
9. Visibility at a second location:
Some airports are able to report visibility in several areas on the airfield. You will only see this remark if the second location has worse visibility than the main reporting station. It looks like this: VIS 2 1/2 RWY 11.
10. Lightning
You will see this reported as contractions from the acronyms below when at a manual station. For example, OCNL LTICCG means occasional lightning of less than 1 flash per minute in cloud and cloud to ground.
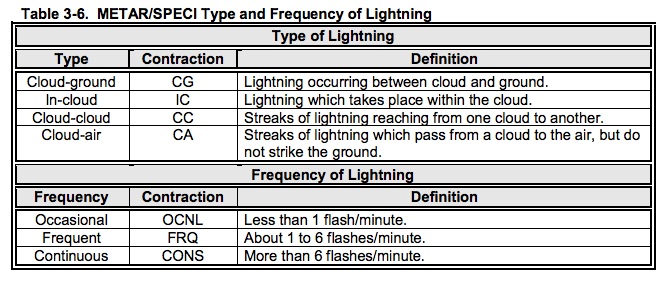
At automated stations, you won’t see such detail. You will only see LTG DSNT in the remark section.

I’m not sure how you would know if you have an automated or manual station.
11. Beginning and End of Precipitation: This one requires you to know your basic types of precip like RA, SN, and SH. You also need to know that “B” stands for “begin” and “E” is for “end.” Also, the time is always minutes after the hour. So a “35” means 35 minutes past the hour.
So here are some examples you will see: RAB05E30SNB20E55 or SHRAB05E30SHSNB20E55 or RAESNB42. Are you confused yet?
Let’s take the first one and then you can figure out the other two.
RAB05E30SNB20E55: Rain began at 5 after and ended at 30 after. Then it started snowing at 20 after and it ended at 55 after.
12. Beginning and end of Thunderstorms: You should be able to get this one after figuring out the one above. Here is an example: TSB0159E30 which means the thunderstorms began at 0159 and ended at 0230.
Are you starting to notice a pattern with these METARs? Once you know how they work, it is much easier to read them.
13. Thunderstorm location and movement:
Here is an example: TS SE MOV NE. Translated it means thunderstorms are moving from the Southeast of the reporting station to the Northeast.
14. Hail size: The acronym for hail is “GR.”
Hail size is reported in 1/4 inch increments. So you would see “GR 1/2″ in the remarks.
15. Virga: these are clouds with precipitation that don’t reach the ground. You will see “VIRGA” and a direction from the station. Example: VIRGA SE.
16. Obscurations:
Sometimes it’s not just precipitation causing low ceilings, it can be dust, sand, or smoke. In that case, you will see the code for the obscuration followed by the ceiling height as a result of the obscuration. For example, a FU BKN002 means smoke is causing a broken ceiling of 200 feet.
Smoke can really mess with pilots. The METAR can report clear skies, and maybe 5 miles of visibility, but in the air, the slant visibility is really low which makes it incredibly difficult to pick out the airport.
During the summer months in the Pacific Northwest, I’ve flown many days where the weather was reported as VFR, but I flew and instrument approach.
17. Variable Sky Condition:
If you haven’t figured it out yet, the remarks section loves to talk about variable conditions. Variable sky conditions are no exception. You will see normal cloud reporting with a “V” for variable thrown in the mix. So BKN014 V OVC means there is a 1400 foot layer that varies between broken and overcast.
18. Significant Cloud Types:
There are a multitude of different cloud types such as:
- Cumulonimbus (CB) or Cumulonimbus Mammatus (CBMAM),
- Towering Cumulus (TCU),
- Altocumulus Castellanus (ACC)
- Standing Lenticular (SL) which are further broken down into three subtypes:
- Cirrocumulus (CCSL),
- Altocumulus (ACSL),
- Stratocumulus (SCSL).
These clouds will always be followed by a cardinal direction they are moving from and to. So a TCU W means a Towering Cumulus is West of the station. Or a CB W MOV E a Cumulonimbus is West of the station moving East.
19. Ceiling Height at a Second Location
When the ceiling height at a second location on the reporting station has a lower value, you will find it in the remark section. You should key in on this discrepancy. The lower ceiling could be on the approach end of the runway you want to use.
Check out KEUG. The main weather report has a broken ceiling of 4200 feet. ![]()
But the Remarks section has a secondary ceiling of 3500 feet:
![]()
20. Pressure Rising or Falling Rapidly
If you see this in the remarks section you need to watch out. Don’t be fooled by the current METAR. With a rapid pressure change, you will start to see weather move in or out with winds.
It looks like this: PRESRR or PRESFR
21. Sea Level Pressure
I see this one all the time. I don’t pay too much attention to it because the number that follows is reported in hectopascals. Unless you have an altimeter that lets you dial in hectopascals, this number won’t do you much good. Take a look at this one:
![]()
It means the Sea Level Pressure is 1008.8 hectopascals. If the value is below 1000 then you will see it written like this: SLP952 or 995.2 hectopascals. If there is no SLP available you will see SLPNO.
22. Aircraft Mishap: ACFT MSHP this one is self-explanatory
23. No SPECI reports: NOSPECI
When the weather is bad or changing rapidly and you see this, be careful. This means the METAR is only reported every hour. You won’t get any Special reports within that hour to alert you to sudden changes in ceilings or precipitation.
24. Snow Increasing Rapidly
If the snow increases more than 1 inch in the last hour you will see this in the Remarks section. “SNINCR” will be followed by a couple of numbers that indicate the amount of snow in the last hour and how much snow is on the ground.
So a SNINCR 3/15 means there was 3 inches of snow in the last hour and there are 15 inches of snow on the ground.
For more detailed information, check out: Aviation Weather Services Advisory Circular 00-45G
25. Other Significant Information
Stations will choose to add information as needed in plain language.
That’s it! That wraps up the information most pertinent to you as a pilot.
The next section covers information primarily used by the National Weather Service. If you’re curious I explain what all this information means, but you’ll never use this information.
Additive and Automated Maintenance Data: not meant for pilots!
Now on to the part of the METAR that doesn’t make sense. Look at all of these! What does it all mean? Keep reading and I will tell you.
![]()
![]()
![]()
![]()
![]()
27. Precipitation:
The “P” stands for precipitation and the numbers that follow indicate the amount. So a 0002 means 00.02 inches has fallen in the past hour.
Good luck trying to figure out if that is a lot or not. It’s best not to pay attention to this one. If you see a P0000 then nothing has registered. It’s not raining. Great.
You will also see more numeric codes. There are so many I don’t want to get into them.
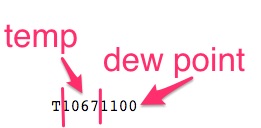
28. Hourly Temperature and Dew point (Celsius)
This one always gets people. Feel free to never pay attention to this number. It is already reported in the main body of the METAR.
But for those of you who want to know what it means, here is an example and a breakdown of each part:
T00261015 translates to The temp is 2.6 degrees and the dew point is negative 1.5 degrees.

Here is another example. Remember the “1” means a negative number. The temperature is -6.7 degrees and the dew point is a -10.0 degrees.
29. Sensor Status Indicators
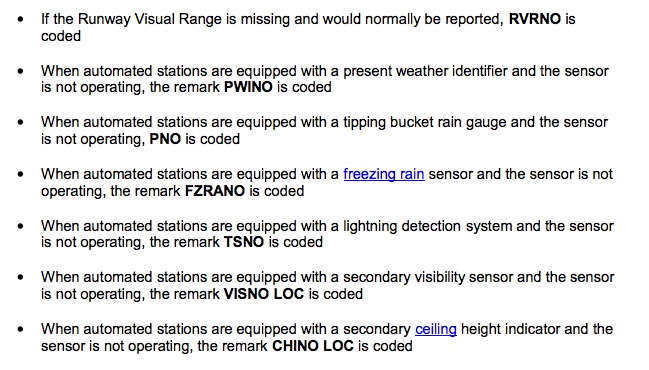
Check out this excerpt from the Aviation Weather Services AC 0045g. Interesting stuff, but not the end of the world if you don’t know them.
30. Maintenance Indicators.
Have you ever wondered what the $ sign is at the end of the METAR?
It means someone needs to do some maintenance on the automated station.
Here is an example:

Whew!!! That’s it! That covers all of the Remarks section.
Additional Reading:
Aviation Weather Services Advisory Circular 00-45g. It’s a gold mine of weather chart information.
How to Decode Terminal Aerodrome Forecasts (TAFs)
A Complete Guide to Decoding NOTAMs
What Does “AUTO” mean in the METAR?
What is the Difference Between ASOS, AWOS and ATIS?
That’s it! I hope this article helped.
For a more comprehensive article that includes how to decode METARs, TAFs and NOTAMs enter your email below. I’ll send you a really useful PDF you can always reference.
