IFR clearances are intimidating even for experienced instrument pilots, but they don’t have to be.
Like most things in aviation, complex tasks like copying clearances become infinitely easier when you create a habit and develop a system. I’ll show you that system.
So, what’s the best way to copy clearances quickly and accurately?
First, let’s cover the basics.
What is the basic structure of an IFR clearance?
- Airport you are filing to
- Departure procedure and/or the departure heading
- Route
- “Climb and Maintain” Initial Altitude
- Altitude you can expect in 5 or 10 minutes (this is not always given)
- Departure frequency
- Squawk code
Some pilots use the ‘CRAFT” mnemonic to remember what’s in a clearance. Personally, I’ve never found that mnemonic helpful when I’m actually copying a clearance, and I’ll show you why in this article. But, some people like it, so I’ll throw it out there.
- Clearance limit (ie, where are you going?)
- Route
- Altitude
- Frequency
- Transponder
Here is a real-life example of a clearance:
Can you spot the different elements? Notice, I didn’t write “CRAFT” on my paper prior to copying the clearance? It’s unnecessary.
This example is actually too long. I’ve tightened up my technique for writing clearances after reading Jeff Kanarish’s Radio Mastery for IFR Pilots (which I HIGHLY recommend you read).
Before I show you how to write a clearance quickly, it’s important to understand controllers use the same language ALL the time. I cannot stress this enough.
Every pilot should be able to predict what ATC will say during all phases of instrument flying. Make it a game and guess the next ATC call. This applies to clearances too. Guess what they will give you BEFORE calling. Nothing in instrument flying requires a degree in physics. IFR radio calls are virtually the same every time. It only seems confusing and intimidating because you haven’t learned the patterns yet.
When you understand the basic format of a clearance you can anticipate what they will say prior to calling which is key to copying clearances.
With that said, there are things every pilot can do to set themselves up for success during flight planning and prior to calling. One of my instructors is fond of saying “it’s not a push to think button, it’s a push to talk button.” I always roll my eyes, but I agree with the saying.
Prior to calling clearance, every pilot should do these four things in order:
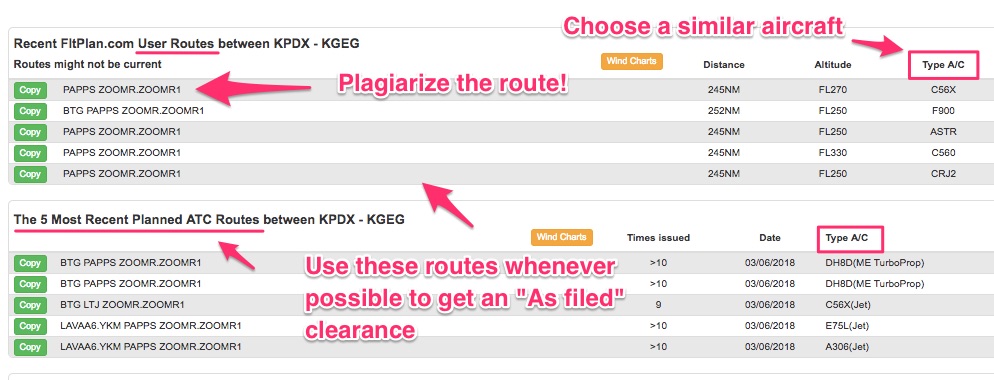
Use preferred ATC routes, or routes used by other pilots when filing your flight plan. This will save you from getting a dreaded “prepare to copy.”
- Write down the destination’s airport ICAO identifier first on the paper. The destination airport is the beginning of the clearance, so write it down before calling. If you’re familiar with the airport, write down the SID too.
- Get ATIS. Clearance Delivery and/or Ground will want to know if you have it, so do it now. They will also need to know where you’re parked so take a second to remember the name of the FBO.
- Study the departure procedures or the ODP pertinent for your type of aircraft. You’ll have a much better chance of writing it down correctly if you look before you call. Take a look at the surrounding VORs as well. Some VORs aren’t spelled remotely close to the name.
- Pro Tip: have a list of the SIDs out when you call to make it easier to identify the SID when Clearance speed reads. They always go too fast when you need them to go slow.
- Make a mental note of the departure frequency. If you get a speedy controller you’ll have a much better chance of writing down the correct freq.
- Note: sometimes they will just give you the SID and not tell you a departure frequency. Use the one on the SID. I have found some airports always give you the departure frequency and some never give it to you.
Once you have done those four things you are ready to call! The next part of the article will cover some shorthand techniques.
How to copy a clearance quickly using abbreviations
The first thing clearance will say is your call sign followed by “cleared to XXX airport.” You know this is coming, so write down your arrival airport before you call.
After the destination airport comes the departure procedure or the heading. If I’m familiar with the airport and know what SID they’ll give, I write it down before I call. Every airport has it’s favorite departure procedure and you will learn them over time.
For example, when I fly out of Salem, OR, they always give me the Salem 4 departure. Here is how I abbreviate the Salem 4 departure.
SLE4 or S4
Lately, I have taken to only writing the first letter of the SID and then the number. For example: for the Salem 4 departure I write S4. For the Seattle 4 departure, I write S4. Get my drift? The controllers are FAST! It can be hard to copy it all down.
At unfamiliar airports, this is more difficult. This technique only works if you review the complete list of SIDs prior to calling.
PRO TIP for digital users: bring up a list of all the SIDs for the departure airport. Have it visible when you write down the SID from clearance. You can quickly look over at the list if the controller speeds through the pronunciation. If they go too fast, write down the first letter and number and then look at the SID list as you read your clearance back to get the proper pronunciation and full name. This tip has saved me countless times at larger unfamiliar airports.
The next part will either be awesome….or not. If you have done some good flight planning you will hear: “as filed.” I abbreviate it as:
AF
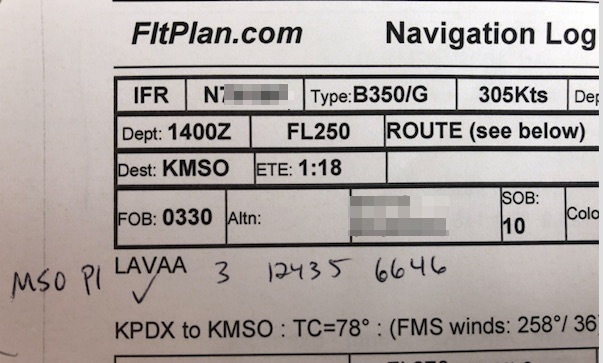
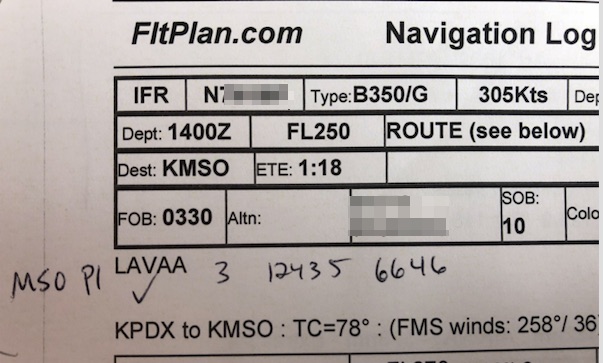
Jeff Kanarish, in his book “Radio Mastery for IFR Pilots,” recommends putting a check mark under the flight plan if it’s an “As filed” clearance. I like this technique and I use it now. It’s really helpful when you have a paper dispatch from operations or a print out from Fltplan.com. Put a check mark on your flight plan to annotate they gave you what you wanted. Remember, though, say “as filed” when you read back your clearance and not your entire flight route if you do this. If you think you’ll get confused and re-read your entire route vs saying “as filed”, then write AF to remind you to say “as filed.
Here’s an example of this technique in practice:
If you don’t get an “As filed” clearance, take a deep breath. There are two things you can do to help when ATC issues a new clearance.
First, don’t be a hero, ask the controller to spell out the points. Remember, they are always five letters unless they are a VOR which is three letters.
Second, study the departure procedure and all the names of the VORs in the departure plate prior to calling. A lot of VORs have abbreviations that aren’t remotely close to the three letter identifier.
Third, to avoid this problem in the future, ask the controller if this is a normal route structure or a one-time clearance. If it’s normal, now you now know how to file in the future. Over time you will learn the idiosyncrasies of each airport, and believe me, each airport has its own way of doing things.
But….there is another way to eliminate this problem I mentioned earlier.
Use ATC preferred routes. Don’t worry, though, you don’t need to know what these are. Your fellow pilots know these routes already and you can plagiarize. This is also the best and fastest way to do IFR flight planning.
How do you increase your chances of getting an “as filed” clearance?
Step 1: Go to Fltplan.com (Foreflight also has this feature) and fill out your departure and arrival airports.
Step 2: Scroll down and look at the previously filed routes. Find an aircraft with similar performance to yours.
Step 3: Click the “COPY” button and hit file! Boom! Done!
ATC will give you this flight plan almost every time and you’ll never have to scramble to write down a new clearance. It also takes the guesswork out of flight planning.
The only issue with this technique is when there isn’t an aircraft with similar performance. However, it is a great starting point even if there isn’t an aircraft like yours. Always check user and ATC routes prior to flight planning.
Next, you can expect a “climb and maintain” altitude. When you fly out of the same airport you will get used to the same altitude every time. For example, KPDX usually issues a 3,000-foot clearance.
Don’t write out 9000 or 2000. There’s no point. You know it isn’t 2 feet. It’s quicker to write the first number of the clearance and be on your way. So, a 4000-foot initial altitude is just “4” on the paper.
There is a variation to this call: “Climb via the SID.” When this happens I just write an upside down L and SID. I go back later and copy down the altitude on the SID before I take off.
Sometimes clearance will give you an altitude to expect 5 or 10 minutes after departure. Not all airports do this. I use “x” for “expect. The “x 5” is just a reminder it’s 5 minutes. This is what I write:
x 240 5 min or: x 240 5
Next is the departure frequency. It’s probably the departure frequency on the SIDs or approach plates but not always. Take a look at a SID before calling and make an educated guess.
125.8
The decimal is overkill. I don’t use the decimal anymore, but the decimal is a reminder it’s a frequency and not a transponder code. Sometimes clearance won’t issue a frequency at all. If that’s the case, go back later to the SID and use the frequency on the departure plate.
Finally, they will end with squawk code which is self-explanatory.
2306
Here is an example of a clearance using all the tricks I mentioned. Do you see now why I don’t find the “CRAFT” mnemonic useful?
I would read this clearance back by saying:
“N123AB is cleared to Missoula via the Portland 1 departure, then as filed, climb and maintain 3000, departure is one-two-four-point-three-five, squawk six-six-four-six.”
So now you know how the pro’s do it, let’s review the basic rules of copying clearances:
- Use preferred routes on Fltplan.com or Foreflight to minimize the chance of getting an amended clearance
- Look at the list of SIDs prior to calling and ideally display the list of the SIDs when calling.
- Look at the VORs in the area prior calling
- Always abbreviate
That’s it! Remember practice makes perfect. Listen to live ATC feeds at http://www.liveatc.net and practice copying clearances.
When you understand the basic framework of clearances and you do your flight planning homework, there’s no need to fear IFR clearances.
One more thing!
Still don’t want to join my email list? That’s okay. You can still download a FREE Ultimate Guide to Decoding NOTAMs below. You can unsubscribe after you downloaded the guide. I don’t mind, seriously.


